Some years ago a wrote an article about automatic data purging with partition switching. Having moved to SQL Server 2016 recently I have encountered the new ability to truncate individual partitions, rather than switching data out.
Background
Partitioning was an enterprise-only feature until SQL Server 2016 Service Pack 1, which allowed developers to have a consistent surface area across environments. At my current employ they use Standard edition of SQL Server and having upgraded to SQL Server 2016 (Standard Edition) SP1 I can now revisit some aspects of SQL Server I haven’t been able to utilise for some time.
In the past I’ve used partition switching to remove data from staging databases – where it was stored having been copied from customer-facing databases prior to being copied to a Data Warehouse. A partition scheme was used that switched data no longer required in the staging database to another table, whereupon that table was truncated.
With the new feature that allows a partition to be truncated (rather than the entire table) it is possible to simplify the partition system used in the previous article on partition switching.
Test Environment
For this demonstration I’ll use the same DDL and data used in automatic data purging with partition switching, with small changes as required. For the finer details of the partition function and scheme, refer to that original article.
Listing 1: Create the database, partition function and scheme
CREATE DATABASE PartitionTest;
GO
USE PartitionTest;
GO
CREATE PARTITION FUNCTION [pf_Retention](tinyint) AS RANGE LEFT FOR VALUES (1, 2)
GO
CREATE PARTITION SCHEME [ps_Retention] AS PARTITION [pf_Retention] TO ([PRIMARY], [PRIMARY], [PRIMARY])
GO
Now the table that uses this partition scheme needs to be created. this time there is no need for the staging table, so that code can be omitted:
Listing 2: Create the table
CREATE TABLE UserAccess(
    UserAccessID        INT IDENTITY(1,1),
    UserID              INT,
    LoginDateTime       DATETIME,
    LogoutDateTime      DATETIME,
    PartitionNumber     AS (CONVERT([tinyint],abs(datediff(day,CONVERT([date],'20000101',(112)),LogoutDateTime)%(3)+(1)),(0))) PERSISTED NOT NULL,
CONSTRAINT [PK_Petdetails] PRIMARY KEY CLUSTERED
(
    UserAccessID        ASC,
    PartitionNumber     ASC
) WITH (IGNORE_DUP_KEY = OFF, ALLOW_ROW_LOCKS = ON, ALLOW_PAGE_LOCKS = ON, DATA_COMPRESSION = PAGE) ON ps_Retention(PartitionNumber)
) ON ps_Retention(PartitionNumber)  ;

GO
Again, for a detailed explanation of the persisted column (PartitionNumber) in the table above, refer to the original article.
Now insert the same test data as used in the original article:
Listing 3: Test Data
USE [PartitionTest]
GO

INSERT INTO [dbo].[UserAccess]
           ([UserID]
           ,[LoginDateTime]
           ,[LogoutDateTime])
VALUES     (1
           ,'20150308 01:00:00'
           ,'20150308 02:00:00'),
            (2
           ,'20150309 01:00:00'
           ,'20150309 02:00:00'),
            (3
           ,'20150310 01:00:00'
           ,'20150310 02:00:00'),
            (4
           ,'20150311 01:00:00'
           ,'20150311 02:00:00'),
            (5
           ,'20150312 01:00:00'
           ,'20150312 02:00:00'),
            (6
           ,'20150313 01:00:00'
           ,'20150313 02:00:00'),
            (7
           ,'20150314 01:00:00'
           ,'20150314 02:00:00')
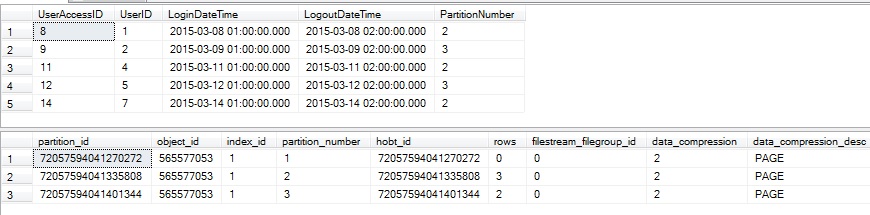
Ensure that there is data in each of the table’s partitions:
Listing 4: Check table and data spread across partitions
SELECT * FROM dbo.UserAccess
ORDER BY UserAccessID;

SELECT * FROM sys.partitions WHERE OBJECT_NAME(object_id)= 'UserAccess';
Figure 1: The results from the queries in Listing 4:

Data before truncation
To demonstrate the command for truncating a single partition:
Listing 5: Truncate partition 2
TRUNCATE TABLE dbo.UserAccess WITH (PARTITIONS (2));

SELECT * FROM dbo.UserAccess
ORDER BY UserAccessID;

SELECT * FROM sys.partitions WHERE OBJECT_NAME(object_id)= 'UserAccess';
Figure 2: Partition 2 has no rows

Data removed from partition 2
Truncating multiple partitions:
Listing 5: Truncate partition 1 and 3
TRUNCATE TABLE dbo.UserAccess WITH (PARTITIONS (1,3));

SELECT * FROM dbo.UserAccess
ORDER BY UserAccessID;

SELECT * FROM sys.partitions WHERE OBJECT_NAME(object_id)= 'UserAccess';
Figure 3: Partitions 1 and 3 now truncated

Table is now empty
Re-run the code from Listing 3 to insert the data again.
To automate the truncation a stored procedure is required. This differs from the version in the previous article as it no longer needs to switch and then truncate – it just needs to truncate the required partition:
Listing 6: Stored Procedure to control truncation
CREATE OR ALTER	PROCEDURE [dbo].[Purge_Table] AS
    SET NOCOUNT, XACT_ABORT ON;

    DECLARE @DaysToKeep             TINYINT,
        @PurgePartition         TINYINT,
        @TotalPartitions        TINYINT,
        @Today                  DATETIME,
        @MaxDateInPartition     DATETIME,
        @DateToPurge            DATETIME,
        @SQLCode                VARCHAR(500)

    SET @TotalPartitions = 3;
    SET @DaysToKeep = 2;

    SET @Today = CURRENT_TIMESTAMP
    SET @DateToPurge = DATEADD (dd, (@DaysToKeep * -1), @Today)  --Includes today. We keep today, we keep yesterday but the day before yesterday needs to go

    SET @PurgePartition = 0

    SET @PurgePartition = (CONVERT(tinyint,ABS(datediff(day,CONVERT([date],'20000101',(112)),@DateToPurge)%(@TotalPartitions)+(1)),(0))) --Same formula as used within the table, but
                                                                                                                                         --using the @DateToPurge, to find what partition
                                                                                                                                         --that date will be in.

    SET @PurgePartition = $Partition.pf_Retention (@PurgePartition)

    -----------------------------------------------------------------------------------------------
    ---- PURGE TABLE
    -----------------------------------------------------------------------------------------------

    --Get the latest LogOutDateTime from the partition that is going to be purged.
    SELECT @MaxDateInPartition = MAX (LogOutDateTime)
     FROM dbo.UserAccess
     WHERE $Partition.pf_Retention (PartitionNumber) = @PurgePartition

    IF EXISTS (SELECT 1 FROM dbo.UserAccess
                WHERE PartitionNumber = @PurgePartition) --Check there is data for this partition
        BEGIN
            IF DATEDIFF (dd, @MaxDateInPartition, @Today) >= @DaysToKeep OR @MaxDateInPartition IS NULL --Check the date within this partition is old enough to be removed
            BEGIN
                SELECT @SQLCode = 'TRUNCATE TABLE dbo.UserAccess WITH (PARTITIONS (' +
                    CAST (@PurgePartition AS varchar) +
                    ' )) '

                EXEC (@SQLCode)

                RAISERROR ('The dbo.UserAccess Table has been successfully Purged.', 10, 1)
            END
            ELSE
                RAISERROR ('OPERATION CANCELLED. Incorrect Data would be purged from dbo.UserAccess',16, 1)
        END
    ELSE
        RAISERROR ('dbo.UserAccess - partition has no data', 10, 1)
GO
Now execute the stored procedure and examine the table and partition details:
Listing 7: Partition truncation via stored procedure
EXEC [dbo].[Purge_Table]

SELECT * FROM dbo.UserAccess
ORDER BY UserAccessID;

SELECT * FROM sys.partitions WHERE OBJECT_NAME(object_id)= 'UserAccess';
Figure 4: Results from Listing 7 – one partition truncated
Partition truncated via SP
Please note that the selection of the partition is date dependant, so may change.
Conclusion
Partition truncation simplifies the removal of data – it is part of the TRUNCATE TABLE command and does not require a staging table. Where data needs to be moved (as oppose to deleted) then partition switching is still the method to use.
References
automatic data purging with partition switching
Microsoft Docs – Truncate Table

One thought on “Automatic Data Purging With Partition Truncation”