Introduction
As part of my research into the various methods of protecting sensitive data, I’ve taken a look at dynamic data masking. A short demonstration and some observations are in the following article.
Background
One aspect of protecting data is ensuring that it is only seen by those that should be able to see it – people only have access to the information that they need, according to pre-defined security levels. This has become a far more prominent issue with the advent of GDPR, although it should have always been a major focus of any organisation that stores or handles personally identifiable information (PII).
Microsoft introduced dynamic data masking with SQL Server 2016, which introduces a method of masking data for those accounts that do not have the required permissions.
Test Environment
Create a simple test database, and a database user that is a member of db_datareader.
Listing 1: Create Initial Test Database and User
CREATE DATABASE DDM_Test; GO USE DDM_Test; GO CREATE USER TestUser WITHOUT LOGIN; ALTER ROLE [db_datareader] ADD MEMBER [TestUser] GONext, two tables are to be created. These tables are deliberately rather basic, without indexes or foreign key constraints – just concentrating on the required pieces for this article.
Listing 2: Create Test Tables
CREATE TABLE Characters( ID INT IDENTITY(1,1) NOT NULL, Forename VARCHAR(50) MASKED WITH (FUNCTION = 'partial(1,"!!",0)') NOT NULL, MiddleName VARCHAR(50) MASKED WITH (FUNCTION = 'default()') NULL, Surname VARCHAR(50) MASKED WITH (FUNCTION = 'partial(2,"XYZ",1)') NULL, Interests INT MASKED WITH (FUNCTION = 'random(20,30)') NULL, Email VARCHAR(50) MASKED WITH (FUNCTION = 'email()') NULL, Phone VARCHAR(30) MASKED WITH (FUNCTION = 'default()') NULL, DOB Date MASKED WITH (FUNCTION = 'default()') NULL, Salary INT MASKED WITH (FUNCTION = 'default()') NULL, AdditionalNotes VARCHAR(200) NULL, Age AS (DATEDIFF(year, [DOB], Getdate())) ); GO CREATE TABLE Interests( ID INT MASKED WITH (FUNCTION = 'default()') IDENTITY(1,1) NOT NULL, LIKES VARCHAR(200) NOT NULL ); GOThe two tables have a MASKED WITH option, against those columns that I want to ‘disguise’ from those user accounts that do have the required permission. At this moment, there are four functions that can be used to mask data:
Partial – replaces the column data with the characters supplied in the second parameter (“!!” for Forename and “XYZ” for Surname), displaying the actual data for the specified number of characters from the start of the column data and the end of the column data, as specified in the first and third parameters. So, the Forename column will display the first character of the true data, then the characters “!!” for the rest of the data – because the third parameter is zero.
Default – replaces the column data dependent upon the type of data column – “XXXX” for character type columns, the number zero for numeric columns, ASCII zero for binary columns and 01-10-1900 00:00:0000000 for date and time columns.
Email – Shows the first character of the email address and uses ‘.com’ as the suffix, with “XXX@XXXX” for the remainder of the address.
Random – Displays a random number from the supplied from/to range. So, the ‘Interests’ column will display a random number from 10 to 30.Now we add the data to these tables:
Listing 3: Insert the test data
INSERT INTO [dbo].[Interests]([LIKES]) VALUES ('Carrots'), ('Money'), ('Hunting'); GO INSERT INTO [dbo].[Characters]([Forename], [MiddleName], [Surname], [Interests], [Email], [Phone], [DOB], [Salary], [AdditionalNotes]) VALUES ('Bugs', NULL, 'Bunny', 1, 'Bugs@someemail.com', '555-001-002-003', '20 Apr 1938', 240000,NULL), ('Daffy',NULL,'Duck',2,'Daffy@someotheremail.com','555-123-456 Ext 27', '17 Apr 1937', 200000, NULL), ('Elmer','J','Fudd',3,'EJF@HumtingForever.com','555-1212-3434','17 Jul 1937', 160000, 'Likes everybody to be very quiet'), ('Wile', 'E', 'Coyote', 3, 'SuperGenius@acme.com','555-565656-345','17 Sep 1949', 185000, 'Astronomical health insurance'); GOQuerying the Data
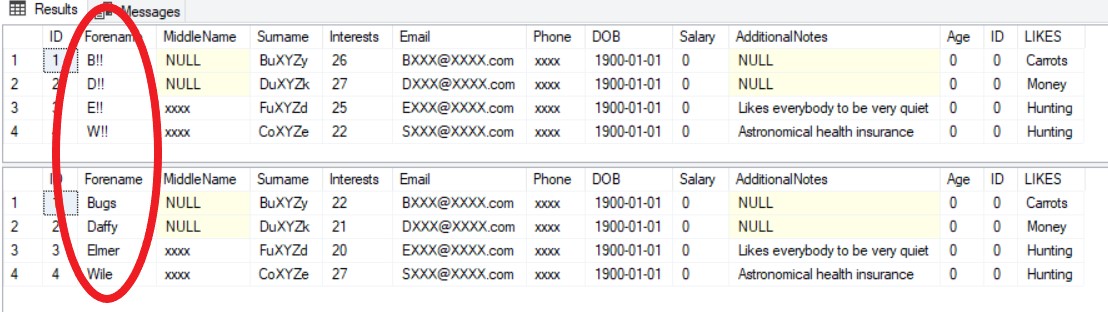
At this point in time, because I am a member of the sysadmin role, the masking is not evident. If I run a query against this data I can see all of the data in all of the columns:
Listing 4: Query the test data as sysadmin
SELECT * FROM Characters c LEFT OUTER JOIN Interests i on i.ID = c.Interests;Figure 1: Result from Listing 4
Query result as sysadmin
If I now switch to the TestUser user, which does not the required permission to view masked data, the impact of dynamic data masking becomes apparent.
Listing 5: Query the test data as TestUser
EXECUTE AS USER = 'TestUser'; SELECT * FROM Characters c LEFT OUTER JOIN Interests i on i.ID = c.Interests; REVERTFigure 2: Result from Listing 5
Query result as TestUser
Now we can see the impact of the mask functions.
It is important to note that the masking only shows itself at the presentation of the data. The join still works, even though it looks like the column ‘Id’ of the table ‘Interests’ is always zero. It isn’t – it is only shown as that to those that are not permitted to see the original data.
Note that the ‘Age’ column is masked, even though a mask was not specified. Because one of the elements of the computed column is using a mask (‘DOB’), the value displayed by the computed column will be masked too.
Removing a Mask from a Column
To remove a mask completely from a column, there is a DROP MASKED option with ALTER COLUMN.Listing 6: Removing the mask from a column
EXECUTE AS USER = 'TestUser'; SELECT * FROM Characters c LEFT OUTER JOIN Interests i on i.ID = c.Interests; REVERT; ALTER TABLE Characters ALTER COLUMN [Forename] DROP MASKED; GO EXECUTE AS USER = 'TestUser'; SELECT * FROM Characters c LEFT OUTER JOIN Interests i on i.ID = c.Interests; REVERT;Figure 3: Result from Listing 6 – showing un-masked forename column
Before and After un-masking column
Granting Permission to View Masked Data
To give permission for a user to view masked data the UNMASK permission is required.
Listing 7: Assigning Permission to View Masked Data
EXECUTE AS USER = 'TestUser'; SELECT * FROM Characters c LEFT OUTER JOIN Interests i on i.ID = c.Interests; REVERT; GRANT UNMASK TO TestUser; GO EXECUTE AS USER = 'TestUser'; SELECT * FROM Characters c LEFT OUTER JOIN Interests i on i.ID = c.Interests; REVERT;Figure 4: Result from Listing 7
Before/After UNMASK Permission
Using SELECT/INTO
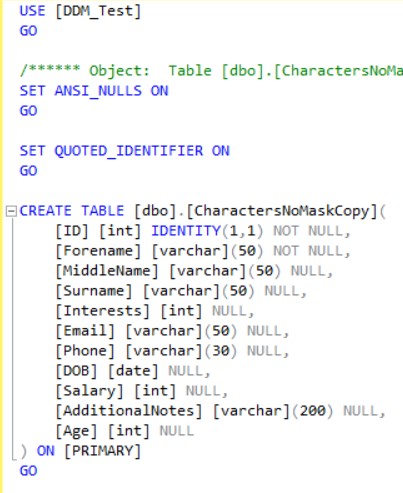
Even if a user does not have UNMASK permission, if they are able to execute SELECT/INTO and create a new table, they are able to extract the data and view it but it will be stored in that table as the masked values – the original data will not be written to that table unless the user has UNMASK permission. When a table is created via SELECT/INTO, the MASK properties for the columns are not copied across to the new table.
Listing 8: Restricted User Copying Data to New Table
REVOKE UNMASK TO TestUser; GO GRANT CREATE TABLE TO TestUser; GO GRANT ALTER ON SCHEMA::dbo TO TestUser; EXECUTE AS USER = 'TestUser'; SELECT * INTO dbo.CharactersNoMaskCopy FROM [dbo].[Characters]; SELECT * FROM [dbo].[CharactersNoMaskCopy]; REVERT;Figure 5: TestUser View of Copied Data
Values written to new SELECT/INTO target
Figure 6: New table without mask properties
SELECT/INTO target without mask
Execution Plan
There does appear to be an overhead, detailed within the execution plan. Although this small demonstration will not show a significant difference, it may be worth further investigation, if you are concerned about any performance impact from applying masked data columns.
Figure 6: Query Plan Expressions – no Data Masking
Query Plan Expressions Without Masking
Figure 7: Query Plan Expressions – Data Masking
Query Plan Expressions With Data Masking
Conclusion
Dynamic data masking creates a simple and easy method of protecting data from unauthorised viewing but it is rather basic. It does not mask the data within the database itself, only when the data is presented (i.e. from the result of a SELECT statement). Therefore, the data is still vulnerable – from copying the backups or suchlike.
References
Dynamic Data Masking
GDPR
Phil Factor – Unmasking the Dynamic Data Masking