
A couple of questions recently in SQL Server Central have related to Snapshot Backups and reminded me of an article I wrote a few years ago about such things for the Developers in my office.
So, using that as a basis for this article I’m going to explain the basics of Snapshot Backups.
In the past I’ve had to run tests against some databases that would take upwards of 30 minutes to restore whenever I wanted to repeat those tests. This is a waste of my time and resources as it also brought my PC to a halt whilst running. Of course, you can take copies of individual tables if you’re only interfering with a small number and move the data back to repeat a test. However, there are occasions where there are numerous tables impacted and it just isn’t a realistic option.
This is where you can take a Snapshot. A Snapshot is effectively a read-only copy of the database, generated by SQL Server as the data is changed. You can run SELECT statements against a Snapshot Database as if it were the original – any data altered within the originating database is within the Snapshot in its original state and if the data you want has not been altered then SQL Server will look in the originating database; your query just needs to look at the Snapshot Database without caring if the data will actually be held in there or not.
To create a Database Snapshot, you need to know the actual filenames that the database is made from. The easiest way is to use SQL Server Management Studio, right-click on the database and look at the properties. We’re after the ‘file’ information:
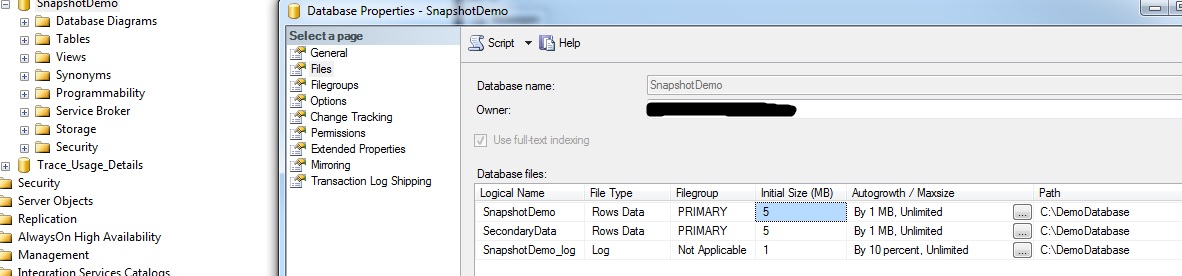
This particular database has two files for storing the data – ‘SnapshotDemo’ and ‘SecondaryData’.
To create a snapshot, you need to have a folder where the Snapshot data will be stored and then tell SQL Server to store the data from the two files detailed above into files within this folder (it will create the files but the folder needs to exist beforehand):
CREATE DATABASE SnapshotDemo_Snapshot01 ON
(NAME = SnapshotDemo, FILENAME = 'C:\Demo Snapshots\SnapshotDemo01.SS'),
(NAME = SecondaryData, FILENAME = 'C:\Demo Snapshots\SecondaryData01.SS')
AS SNAPSHOT OF SnapshotDemo;
I’ve created the Snapshot files based on the names of the original files. The ‘SS’ extension is the usual extension used for snapshot data but neither of these matter – you can call the files whatever you like.
Once the command runs I now have a Snapshot Database:

Before I change any data, both are essentially identical databases. The difference is that the Snapshot is read-only. Running a SELECT against both databases gives the same results:

As an aside, the data was generated by Redgate’s SQL Data Generator – a wonderful tool if you ever get the opportunity to grab it.
Now I run a DELETE against the originating database – removing the rows that have ‘ACTIVE’ set to 0 and repeat the previous query:
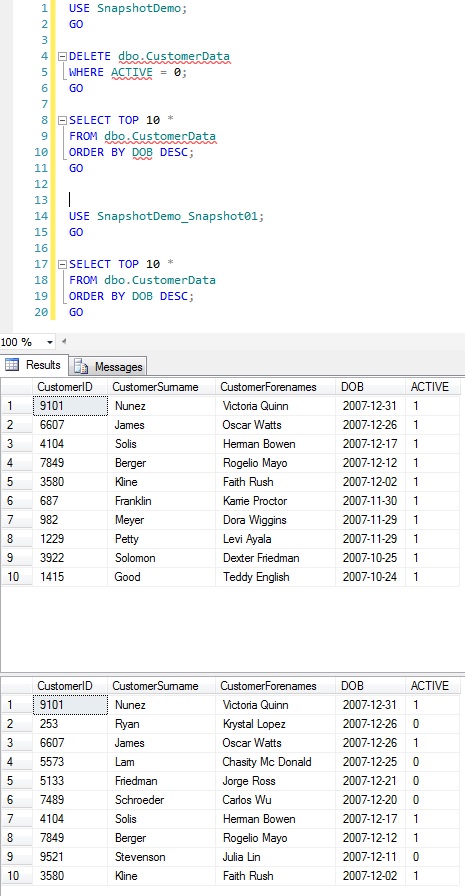
Now the data in ‘SnapshotDemo’ shows the data as it is after the DELETE but ‘SnapshotDemo_Snapshot01’ shows the data as it was before the change.
I can now make whatever changes I want to the data within the originating database and SQL Server will track the alterations, keeping the original data within the Snapshot.
When I need to restore the data I don’t use the ‘usual’ restore. Instead I restore the Snapshot:
RESTORE DATABASE SnapshotDemo
FROM DATABASE_SNAPSHOT = 'SnapshotDemo_Snapshot01';
For a large database this can take a fraction of the time a ‘normal’ restore requires. The restore time varies depending upon how much data you have been playing with but the important thing is that it is just the altered data – it doesn’t restore the entire database (unless you’ve changed all data within the entire database of course).
Now repeat the SELECT statement from earlier:

So the database has been restored back to the state it was in when the snapshot was taken and I can play all over again.
In a future article I’ll look more closely at what a Snapshot actually does behind the scenes but this basic example and explanation should give an idea of the usefulness of this somewhat underused facility.
